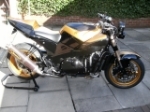
madcarper 0 Posted September 22, 2011 ok as promised here is the start of my project to streetfighter my zzr.bike as i got it,stripped downsome tasty partschop chopmake some alloy brackets Share this post Link to post Share on other sites
stantheman 0 Posted September 22, 2011 looking good ian Share this post Link to post Share on other sites
madcarper 0 Posted September 22, 2011 thanks stan heres some more,and thanks again for alloy platehad to cut down and reshape zzr side panelson the bike thats it for now doubt i'll get much more done this weekend as am at a funeral sat and going to mag demo ride on sunday see ya. Share this post Link to post Share on other sites
BanditMike 0 Posted September 23, 2011 Looking good Should be an interesting when finished. Bit for me as I'm considering a ZZR for my next bike and that one looked very nice. However I await the new improved ZZR Share this post Link to post Share on other sites
madsod 0 Posted September 23, 2011 now that is some super work , Share this post Link to post Share on other sites
fr499y 0 Posted September 23, 2011 quick question.. the seat cowl for the pillion, is it red and if it in good nick? cause i got one that doesnt quiet match my zed in red.. ( was sprayed closest as possible ) fancy swapping if yours is in good nick and right colour? Share this post Link to post Share on other sites
stantheman 0 Posted September 23, 2011 fantastic mate Share this post Link to post Share on other sites
Stue11 0 Posted September 23, 2011 Excellent work mate shes gonna look mighty fine with that new back end, good job and ile look forward to future updates Share this post Link to post Share on other sites
steph42 0 Posted September 23, 2011 nice work so far Share this post Link to post Share on other sites
madcarper 0 Posted September 23, 2011 thanks lads, fr499y it has a few scuffs on it m8 and the mounting for the catch underneath has snapped of so i will be fixing it somehow! i'm painting it so was not to fussed , if it was as you want i wud swap no problem. i can paint yours if you want. after i finish sorting the arsend i need to make some kind of cowling to fill the gap between the frame and tank . this will have to incorperate an air duct for the ram air and to cover the thermastat housing on the opposite side of frame, have seen similar kind of thing on hayabusa streetfighter but can't seem to find a supplier. heres some pics of said gapthis is one ugly front end without it;s clothes on. think i have my work cut out here Share this post Link to post Share on other sites
dick65 0 Posted September 23, 2011 thats gonna take some working out apart from that its looking good Share this post Link to post Share on other sites
pugeyed 0 Posted September 24, 2011 nice project matey!if it were me i would get some aluminium panels made to hide the gap, that way you can cut in slots for the forced air induction/ram air.or if you handy with the old metal you could do something like this chap.although he has made a turbo busa!http://www.customfighters.com/forums/showthread.php?t=37937&page=3 Share this post Link to post Share on other sites
stantheman 0 Posted September 24, 2011 still got lots of ally plate if you want some ian 3 mm thick you can have as much as you want Share this post Link to post Share on other sites
inch_speller 0 Posted September 24, 2011 Nice infill on the tail.Keep the updates coming Share this post Link to post Share on other sites
madcarper 0 Posted September 24, 2011 Thanks stan may take you up on that can you easily bend it by hand. did think about altering tank but i think it will look to bulky and i would still need to incorperate the ram air inlet. i am thinking of cutting off the thermostat/radiator filler crap off the other side, wich will mean changing radiator to one with it's own filler cap and fitting an inline temp sensor and just doing away with the thermostat as i can manage without it as it has a manual choke, what you reckon?. Share this post Link to post Share on other sites
trebor4460 0 Posted September 24, 2011 Nice project, seat unit looks nice, Share this post Link to post Share on other sites
haveugot1 0 Posted September 25, 2011 Looking well ian Share this post Link to post Share on other sites
fr499y 0 Posted September 25, 2011 Ah ok no worries! if it was in good nick and you was gunna spray i would of swapped ya lol. There like rocking horse shit to get in the red i need bikes looking good, deffo needed a slimmer/sleak ass end to sort it out Share this post Link to post Share on other sites
madcarper 0 Posted October 9, 2011 Update , ok been working on making the panels to fill the gap between the tank and frame but also to incorperate the ram air ducting.This will be a three stage procedure 1 make panel/pattern for mould 2 from this make a mould with fibreglass 3 using the mould make the panels out of fibreglass.started by using origonal filler panel ,cutting it down so i basically just had the mounting points and the shape where it meets the tank.then i bonded on some pieces of block styrene and cut and sanded this to roughly the shape i wanti used a paint pot lid to get the right size hole in endthen i glassed over this to stiffen it all up then used body filler to get the shape perfect.one side pattern done and on bike one still to finish.be glad when this part is all done, fibreglass bloody horrible stuff to work with. Share this post Link to post Share on other sites
XS1100 0 Posted October 9, 2011 Very bloody Good,I agree that resin stinks! Share this post Link to post Share on other sites
Stue11 0 Posted October 9, 2011 Excellent mate, that fibreglass can get messey looking good though Share this post Link to post Share on other sites
lee1 1 Posted October 9, 2011 That looks awsome,great work Share this post Link to post Share on other sites
BanditMike 0 Posted October 10, 2011 Looking good Impressive with the resin work! Looking forward to the finished article Share this post Link to post Share on other sites
haveugot1 0 Posted October 10, 2011 Looks well ian done a good job of incorparating the ram air system into it. Share this post Link to post Share on other sites
dick65 0 Posted October 10, 2011 shapeing up nicely good work Share this post Link to post Share on other sites
madcarper 0 Posted December 8, 2011 got a couple of parts delivered what you reckon. Share this post Link to post Share on other sites
Stue11 0 Posted December 8, 2011 Likeing the of them Share this post Link to post Share on other sites
Tony nitrous 0 Posted December 9, 2011 Interesting project..... I used to have an all black ZZR1100C3 My 'fightered Hayabusa wasn't too pretty when we pulled off the tupperware.Ended up extending the loom. Fuses under the seat,relays under tank behind motor, quite a bit of head scratching.There's a few places making infill panels (for the Busa's) but mine are home made. Share this post Link to post Share on other sites
Tony nitrous 0 Posted December 9, 2011 http://www.streetfighters.com.au/forum/showthread.php?12083-ZZR1100 Share this post Link to post Share on other sites
fr499y 0 Posted December 9, 2011 20 bolts to drop the forks through the yolks :| holy crap!! thats some beefy shit right there!! Share this post Link to post Share on other sites
madcarper 0 Posted December 9, 2011 Nice one Tony i think thats the most zzr i have seen modded anywhere, yea when i took fairing off i was having second thoughts not too pretty!.think i will also be doing a fair bit headscratching, ohh well nowt like a challenge from time to time.I got these yolks because the zx12r usd forks are 20mm shorter and you can drop forks 50mm with these, got them from billetbikebits spoke to guy called roy martin for advice,sent him both my yolks for calcs for cnc machine and back came these babies top job.although i want them more highly polished and am thinking of carrying the polishing thru the frame and swingarm. Plus i think i have decided on colour scheme,mainly black with a kawasaki like pearl green thrown in wherever. was going to be black and white but every man and his dog seems to doing bikes that colour at the moment. Share this post Link to post Share on other sites
stantheman 0 Posted December 9, 2011 if you drop them yokes round ill polish them for you mate Share this post Link to post Share on other sites
dick65 0 Posted December 9, 2011 like the sound of the colour scheme m8 Share this post Link to post Share on other sites
madcarper 0 Posted December 9, 2011 THANKS Stan, got to stick some new bearings in and check everything lines up as i want it first will give you a ring to arrange. Share this post Link to post Share on other sites
stantheman 0 Posted December 9, 2011 @madcarper wrote:THANKS Stan, got to stick some new bearings in and check everything lines up as i want it first will give you a ring to arrange.no bother ian i would love to have some input into your project Share this post Link to post Share on other sites
madcarper 0 Posted December 9, 2011 @dick65 wrote:like the sound of the colour scheme m8 cheers dick will do a couple of spraycards tommorow and see if i like the contrast. Share this post Link to post Share on other sites
Tony nitrous 0 Posted December 9, 2011 My ram-air tubes go through the frame.We just put some mesh over them made fromthe old oil cooler guard.(im not too flash at wireing)Just inside the frame is a plasic tube thatconnects to the air box. The guy who didmost of my wireing drilled a hole in thetube just behind the frame and put in some L.E.D's. I didnt know untill I put the lights on and the ram air-ducts lit up !! Share this post Link to post Share on other sites
madcarper 0 Posted December 9, 2011 yes m8 have already thought about that might put them bikeviz bullets high intensity leds in ram tubes, to be honest i'm pretty shit with electrics too, thats wot mates are for. Share this post Link to post Share on other sites
stantheman 0 Posted December 9, 2011 my son is shit hot with electrics ian Share this post Link to post Share on other sites
madcarper 0 Posted December 9, 2011 it just gets better, do you want a lodger Share this post Link to post Share on other sites
haveugot1 0 Posted December 11, 2011 Cant wait to see the bike finished ian I will have them parts off for xmas as i need a new alarm so going to sort the wiring out and put some new connectors on the indicators, should be fun NOT. Share this post Link to post Share on other sites
madcarper 0 Posted December 11, 2011 ok no worries mark.are you having xmas day off from polishing that bike Share this post Link to post Share on other sites
stantheman 0 Posted December 11, 2011 @madcarper wrote:it just gets better, do you want a lodger i would mate but theres not enough room for all the bikes Share this post Link to post Share on other sites
madcarper 0 Posted December 14, 2011 think these are the colours i'm going for on bike both pearls the black flips to a more graphite colour on the angle or in the sun and the green is very much like kawasaki green except it's a pearl. Share this post Link to post Share on other sites
BanditMike 0 Posted December 15, 2011 Colour scheme looks good Think it will stand out from the crowd Share this post Link to post Share on other sites
haveugot1 0 Posted December 18, 2011 Liking them colours m8 will look very smart Share this post Link to post Share on other sites
dick65 0 Posted December 18, 2011 @madcarper wrote:think these are the colours i'm going for on bike both pearls the black flips to a more graphite colour on the angle or in the sun and the green is very much like kawasaki green except it's a pearl.thats going to look really good m8 Share this post Link to post Share on other sites